
How To Make A Clickable Header in Blogger
How To Make A Clickable Header in Blogger
{Here is part one of the impromptu "Trick Out Your Blog" series where you learned how to use a custom domain on your blog. Some readers had questions about that post. I answer them at the end of this tutorial.}
My hobby is playing with my blog's HTML/CSS code. I took a basic class for my Master's degree (Technology in Education), and also learned HTML in my undergraduate, but I am totally not a professional. I love reading code and figuring things out on my own, which is why my long time blog followers notice constant changes on my blog... all. the. time. My newest trick that I ingeniously figured out on my own: a clickable blog header! Here is how to trick it out on your own Blogger blog (remember, I'm not a professional...just a genius)...this tutorial looks complicated because it is wordy, but it is very easy to do. If you use Wordpress, you can use this tutorial. Please remember that when it comes to code, there are a million ways to "skin a cat". This tutorial is just one way of how to do it.
MeasureIt Firefox Extension
This handy tool lets you measure any element on your screen, if you use Firefox as a browser. This is great for easily finding out how big you want your header to be without looking at code. This is great because my template, and header size, might be different from yours. I use this ALL THE TIME! I also used it to figure out that I can have a custom 200 x 500 pixels Facebook profile picture.
CTR+F or Apple+F
This keyboard command lets you search for specific code within your HTML. This keeps you from going cross-eyed. When you use this command, a little tiny search bar will come up on somewhere on your screen. You can copy, and then paste, code into this search bar to find the strand of code you are looking for.
Scrapblog
I don't have the time to create my images from scrap with Photoshop (which I can seriously spend days doing..it's so addicting!), so I use Scrapblog for all of my custom images on my blog. Once you use it, it's fun to spot the blogs who use it, too. I like Scrapblog because you have "free use" of the graphics, especially if you pay for them (except the licensed images like Disney). You just can't create and sell the images to other people.
Photobucket
I prefer Photobucket because I can change the image and allow the new image to keep the same URL. This is great if you want to change a button for your blog, but don't want to tell everyone who has the button on their blog to change it... it will change automatically. I also use TinyPic for image hosting, too. Use whatever you like, but your image has to be hosted somewhere.
Pixlr
This image editing software is much like Photoshop. Only, it's online and it's free. Whoo hoo! You can also use Phoenix and Photoshop Online. If you have CS5, shut up. No one wants to hear it. :o) If you want to give me CS5, God Bless You!
Image Maps: Online Image Mapper
The clickable header on my blog is called an image map. It is one big picture with areas that you can click on. You can create an image map by hand, but why would you do that when there is this handy tool? It's genius!
Okay, let's take this step by step:
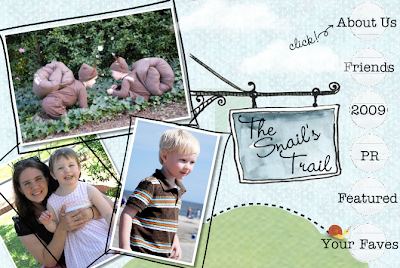
I created my image in Scrapblog. My image filled up an entire "page."

After you create your image, you will save and then publish it. Then if you go to File-->Export as JPEG, you can select your page and save it to your computer as a JPEG image. If you do this, and use this as your header image, your header will be gigantic. How can you fix this? You can upload it to Photobucket and change the dimensions of the image (remember, you can use MeasureIt to get the exact dimensions you want) in Photoshop, Paint, or Pixlr, or, this is how I did it a different way....
With my Mac, I did Shift+Apple(command)+4 (your cursor will become crosshairs...click and drag to select) and did a screen shot of just the image (not a screen shot of the whole page). If you have Windows Vista, search for "screenshot" and choose the "snipping tool" to do the same thing. These two tools allow you to specifically select your screenshot, without capturing everything that is on the screen. You can also use Skitch. This is my .png image that was taken as a screenshot:
If you don't have those tools, you can just use the print screen key on your keyboard and then use a crop tool in your image editing program and crop exactly what you want. Please know that an image of an image is lesser quality.
Next, I uploaded my photo to Photobucket and took note of the URL...you will need that for the image map.
If you don't have pages to link to, you now have to prepare your links for your image map. In Blogger, I created post-dated blog posts ("About Us," "Friends", etc.) and used the permalinks for the posts.{In Blogger, to post-date your new pages, select "Post Options" and then pick a very old date (like 1994) so that these posts don't show up on the front page of your blog or in your friend's readers}. Blogger also offers you the options of creating your own pages, instead of posts. If you are using Wordpress, you can also do post date posts. If you have your own website, and not a blog, you can just create pages.
Next, I went to Image Maps: Online Image Mapper. You can upload an image from your computer, or from a URL, and then "start mapping your image." Follow the directions, it is easy. When making your map, you will see "link for this map." This is where you put the link to the page you want your visitor to go to when they click on that spot in the image. When you are finished, "get your code." You want to use the HTML code. Once you make your image map, you can't resize it. Your "hot spots" are actually coordinates on the map. If you resize your image after you mapped it, the coordinates change and your image map won't work.
In case you want to know (so that you can trick out your image-map in the future),
Here is a brief look at some of the anatomy of your html code:
src= this is the link of your image at your photo hosting place (if you hosted at photobucket, it will begin with: http://img.photobucket.com......) If you ever want to change your src picture, you have to go back into Image Maps: Online Image Mapper and start over again.
coords="10,10,111,79" (your numbers will be different) These are the coordinates of the clickable area of your image map. Can you imagine having to do an image map by hand? This program makes it so easy!
href= this is the link that people will go to when they click on an area of your image map...you can change your href's if you want to! All it will change are the links. It won't effect your image map.
Now, delete all of the following code out of your html code (because you don't need it):
***************************
My hobby is playing with my blog's HTML/CSS code. I took a basic class for my Master's degree (Technology in Education), and also learned HTML in my undergraduate, but I am totally not a professional. I love reading code and figuring things out on my own, which is why my long time blog followers notice constant changes on my blog... all. the. time. My newest trick that I ingeniously figured out on my own: a clickable blog header! Here is how to trick it out on your own Blogger blog (remember, I'm not a professional...just a genius)...this tutorial looks complicated because it is wordy, but it is very easy to do. If you use Wordpress, you can use this tutorial. Please remember that when it comes to code, there are a million ways to "skin a cat". This tutorial is just one way of how to do it.
The Tools I Use
This handy tool lets you measure any element on your screen, if you use Firefox as a browser. This is great for easily finding out how big you want your header to be without looking at code. This is great because my template, and header size, might be different from yours. I use this ALL THE TIME! I also used it to figure out that I can have a custom 200 x 500 pixels Facebook profile picture.
CTR+F or Apple+F
This keyboard command lets you search for specific code within your HTML. This keeps you from going cross-eyed. When you use this command, a little tiny search bar will come up on somewhere on your screen. You can copy, and then paste, code into this search bar to find the strand of code you are looking for.
Scrapblog
I don't have the time to create my images from scrap with Photoshop (which I can seriously spend days doing..it's so addicting!), so I use Scrapblog for all of my custom images on my blog. Once you use it, it's fun to spot the blogs who use it, too. I like Scrapblog because you have "free use" of the graphics, especially if you pay for them (except the licensed images like Disney). You just can't create and sell the images to other people.
Photobucket
I prefer Photobucket because I can change the image and allow the new image to keep the same URL. This is great if you want to change a button for your blog, but don't want to tell everyone who has the button on their blog to change it... it will change automatically. I also use TinyPic for image hosting, too. Use whatever you like, but your image has to be hosted somewhere.
Pixlr
This image editing software is much like Photoshop. Only, it's online and it's free. Whoo hoo! You can also use Phoenix and Photoshop Online. If you have CS5, shut up. No one wants to hear it. :o) If you want to give me CS5, God Bless You!
Image Maps: Online Image Mapper
The clickable header on my blog is called an image map. It is one big picture with areas that you can click on. You can create an image map by hand, but why would you do that when there is this handy tool? It's genius!
Okay, let's take this step by step:
Preparing Your Image
I created my image in Scrapblog. My image filled up an entire "page."

(you can click the image to make it larger)
After you create your image, you will save and then publish it. Then if you go to File-->Export as JPEG, you can select your page and save it to your computer as a JPEG image. If you do this, and use this as your header image, your header will be gigantic. How can you fix this? You can upload it to Photobucket and change the dimensions of the image (remember, you can use MeasureIt to get the exact dimensions you want) in Photoshop, Paint, or Pixlr, or, this is how I did it a different way....
With my Mac, I did Shift+Apple(command)+4 (your cursor will become crosshairs...click and drag to select) and did a screen shot of just the image (not a screen shot of the whole page). If you have Windows Vista, search for "screenshot" and choose the "snipping tool" to do the same thing. These two tools allow you to specifically select your screenshot, without capturing everything that is on the screen. You can also use Skitch. This is my .png image that was taken as a screenshot:

If you don't have those tools, you can just use the print screen key on your keyboard and then use a crop tool in your image editing program and crop exactly what you want. Please know that an image of an image is lesser quality.
Next, I uploaded my photo to Photobucket and took note of the URL...you will need that for the image map.
Preparing Your Image Map
If you don't have pages to link to, you now have to prepare your links for your image map. In Blogger, I created post-dated blog posts ("About Us," "Friends", etc.) and used the permalinks for the posts.{In Blogger, to post-date your new pages, select "Post Options" and then pick a very old date (like 1994) so that these posts don't show up on the front page of your blog or in your friend's readers}. Blogger also offers you the options of creating your own pages, instead of posts. If you are using Wordpress, you can also do post date posts. If you have your own website, and not a blog, you can just create pages.
Next, I went to Image Maps: Online Image Mapper. You can upload an image from your computer, or from a URL, and then "start mapping your image." Follow the directions, it is easy. When making your map, you will see "link for this map." This is where you put the link to the page you want your visitor to go to when they click on that spot in the image. When you are finished, "get your code." You want to use the HTML code. Once you make your image map, you can't resize it. Your "hot spots" are actually coordinates on the map. If you resize your image after you mapped it, the coordinates change and your image map won't work.
In case you want to know (so that you can trick out your image-map in the future),
Here is a brief look at some of the anatomy of your html code:
src= this is the link of your image at your photo hosting place (if you hosted at photobucket, it will begin with: http://img.photobucket.com......) If you ever want to change your src picture, you have to go back into Image Maps: Online Image Mapper and start over again.
coords="10,10,111,79" (your numbers will be different) These are the coordinates of the clickable area of your image map. Can you imagine having to do an image map by hand? This program makes it so easy!
href= this is the link that people will go to when they click on an area of your image map...you can change your href's if you want to! All it will change are the links. It won't effect your image map.
***************************
Now, delete all of the following code out of your html code (because you don't need it):
<!-- Image map text links - Start - If you do not wish to have text links under your image map, you can move or delete this DIV -->
<div style="text-align:center; font-size:12px; font-family:verdana; margin-left:auto; margin-right:auto; width:667px;">
<a style="text-decoration:none; color:black; font-size:12px; font-family:verdana;" href="http://www.image-maps.com/" title="Untitled">Untitled</a>
| <a style="text-decoration:none; color:black; font-size:12px; font-family:verdana;" href="http://www.image-maps.com/" title="Untitled">Untitled</a>
| <a style="text-decoration:none; color:black; font-size:12px; font-family:verdana;" href="http://www.image-maps.com/" title="Untitled">Untitled</a>
| <a style="text-decoration:none; color:black; font-size:12px; font-family:verdana;" href="http://www.image-maps.com/" title="Untitled">Untitled</a>
| <a style="text-decoration:none; color:black; font-size:12px; font-family:verdana;" href="http://www.image-maps.com/index.php?aff=mapped_users_2201004241511331" title="Image Map">Image Map</a>
</div>
<!-- Image map text links - End - -->
</div>
***************************
Now, Trick Out Your Header!
(don't be afraid, it's easy!)
Here is a genius look at the anatomy of the html/css of a Blogger blog. This guy did a great job!
Save your template before you begin any work! If you mess up your blog, you can use the saved version.
***************************


1. First, go to Layout---->Page Elements. Click on a top horizontal "Add a Gadget."
Don't have one there? Move a gadget so that it is horizontal, at the top. (If that doesn't work, go to HTML, find this code: "<b:section class='header' id='header' maxwidgets='1' showaddelement='no'>" and change maxwidgets="1" to "3", save, and go back into layout).
Choose an HTML/JavaScript gadget. DO NOT put in anything for the title...leave that blank. Add your HTML code from your image map. Click on "Save."

If you look at your blog now, you will have two headers: your new clickable header and your original header on top of it:
You are now going to make that original header "disappear."
Don't have one there? Move a gadget so that it is horizontal, at the top. (If that doesn't work, go to HTML, find this code: "<b:section class='header' id='header' maxwidgets='1' showaddelement='no'>" and change maxwidgets="1" to "3", save, and go back into layout).
Choose an HTML/JavaScript gadget. DO NOT put in anything for the title...leave that blank. Add your HTML code from your image map. Click on "Save."

If you look at your blog now, you will have two headers: your new clickable header and your original header on top of it:

You are now going to make that original header "disappear."
***************************
2. Go to your Blogger account and go to Layout----> Edit HTML ----> DO NOT click on "Expand Widget Templates". (please note that everyone has a different template and different HTML.) You want to use CTR+F or Apple+F and search for 'header-wrapper'.

Click "delete widgets."

Your old header is gone and you now have a clickable header!
If this doesn't work for you, email me at thesnailstrail at gmail.com with your questions and I will see if I can help and I will modify these directions.
I actually didn't do it this way, I actually changed the dimensions of the original header and set everything to 0px....but, whatever...a million ways to do the same thing.
Okay, here are the answers to your questions from the first post:
Q: I helped set up a blog for a non-profit that participate with andI set it up as a .com. The only problem is, is that it won't show the "followers" gadget for me so we can see who's following. I've tried several times to find out on the q &A boards from google but can't get an answer. Would u happen to know? I thought maybe it was something to do with it being .com instead of blogger.com, bc my other two blogs show followers w/no problem???
A:Instead of just trying to add the followers widget, you should try to add it manually. Go into your account, and choose "google friend connect." Click on the blog/site that you need to add the followers widget to. Click on "add the members" gadget. You can customize it and then "generate code." Copy the HTML code and place it into an HTML widget on the side of your blog or site.
Q: If I do this little trick (use a custom domain) will it replace my current blog? Will I loose I everything I've written in the past (my biggest fear whenever I mess with the settings?
A: Nope. You won't lose your blog, or any posts, if you switch your .blogspot url to a custom domain name. And, Blogger also forwards your old .blogspot address to your new address so that your readers won't get lost.
Your code might look like this:
Delete this entire string of code. You will get this warning:<div id='header-wrapper'>
<b:section class='header' id='header' maxwidgets='3' showaddelement='yes'>
<b:widget id='Header1' locked='false' title='my family (Header)' type='Header'/>
</b:section>
</div>

Click "delete widgets."

Your old header is gone and you now have a clickable header!
If this doesn't work for you, email me at thesnailstrail at gmail.com with your questions and I will see if I can help and I will modify these directions.
I actually didn't do it this way, I actually changed the dimensions of the original header and set everything to 0px....but, whatever...a million ways to do the same thing.
Okay, here are the answers to your questions from the first post:
Q: I helped set up a blog for a non-profit that participate with andI set it up as a .com. The only problem is, is that it won't show the "followers" gadget for me so we can see who's following. I've tried several times to find out on the q &A boards from google but can't get an answer. Would u happen to know? I thought maybe it was something to do with it being .com instead of blogger.com, bc my other two blogs show followers w/no problem???
A:Instead of just trying to add the followers widget, you should try to add it manually. Go into your account, and choose "google friend connect." Click on the blog/site that you need to add the followers widget to. Click on "add the members" gadget. You can customize it and then "generate code." Copy the HTML code and place it into an HTML widget on the side of your blog or site.
Q: If I do this little trick (use a custom domain) will it replace my current blog? Will I loose I everything I've written in the past (my biggest fear whenever I mess with the settings?
A: Nope. You won't lose your blog, or any posts, if you switch your .blogspot url to a custom domain name. And, Blogger also forwards your old .blogspot address to your new address so that your readers won't get lost.


No comments:
Post a Comment
Terima Kasih Atas Pandangan Dan Komen Anda . Shahril Akan Memperbetulkan Apa Yang Kurang . :) Lepas komen Jangan Lupa Share Artikel Dan Follow Blog Shahril !